Developers spend a lot of time working in their terminal doing the following tasks:
- Navigating the file system
- Manipulating files (creating, updating, reading and deleting)
- Running git commands
- Running local servers
- Running tests
- And a lot more...
Zsh
Zsh is a shell that is very similar to bash, but with a few enhancements. With a few configuration tweaks, this shell can be very powerful.
Installation
Zsh can be installed through homebrew.
1brew install zsh
Once, installed, you can switch the default shell used in your terminal by running the following command:
1chsh -s /bin/zsh
Now, you just need to close and re-open your terminal and then you should be running zsh.
Changing and Updating Zsh Config
Configuration for zsh is done in a .zshrc file found in your home directory (i.e. ~). Whenever a change is made in .zshrc and you'd like to see the changes applied to an already open terminal window, you need to run the source ~/.zshrc command to propagate the changes to the current terminal session. I've setup 2 aliases to make it easier to edit and update the zsh configuration:
1# Open .zshrc to be edited in VS Code2alias change="code-insiders ~/.zshrc"3# Re-run source command on .zshrc to update current terminal session with new settings4alias update="source ~/.zshrc"
.zshrc file.
The above aliases can be added to the .zshrc file. With these aliases, the change command will open .zshrc in VS Code and then the update command will apply the new changes an active terminal session. It should noted that you can also simply open a new terminal tab/window to see the newly applied changes.
A lot of people like to use oh-my-zsh with Zsh since it facilitates the setup of themes as well as the addition of functionality through the oh-my-zsh plugin system. I've moved away from using oh-my-zsh as I've found that it comes along with a lot of bloat that I don't use.
Prompt
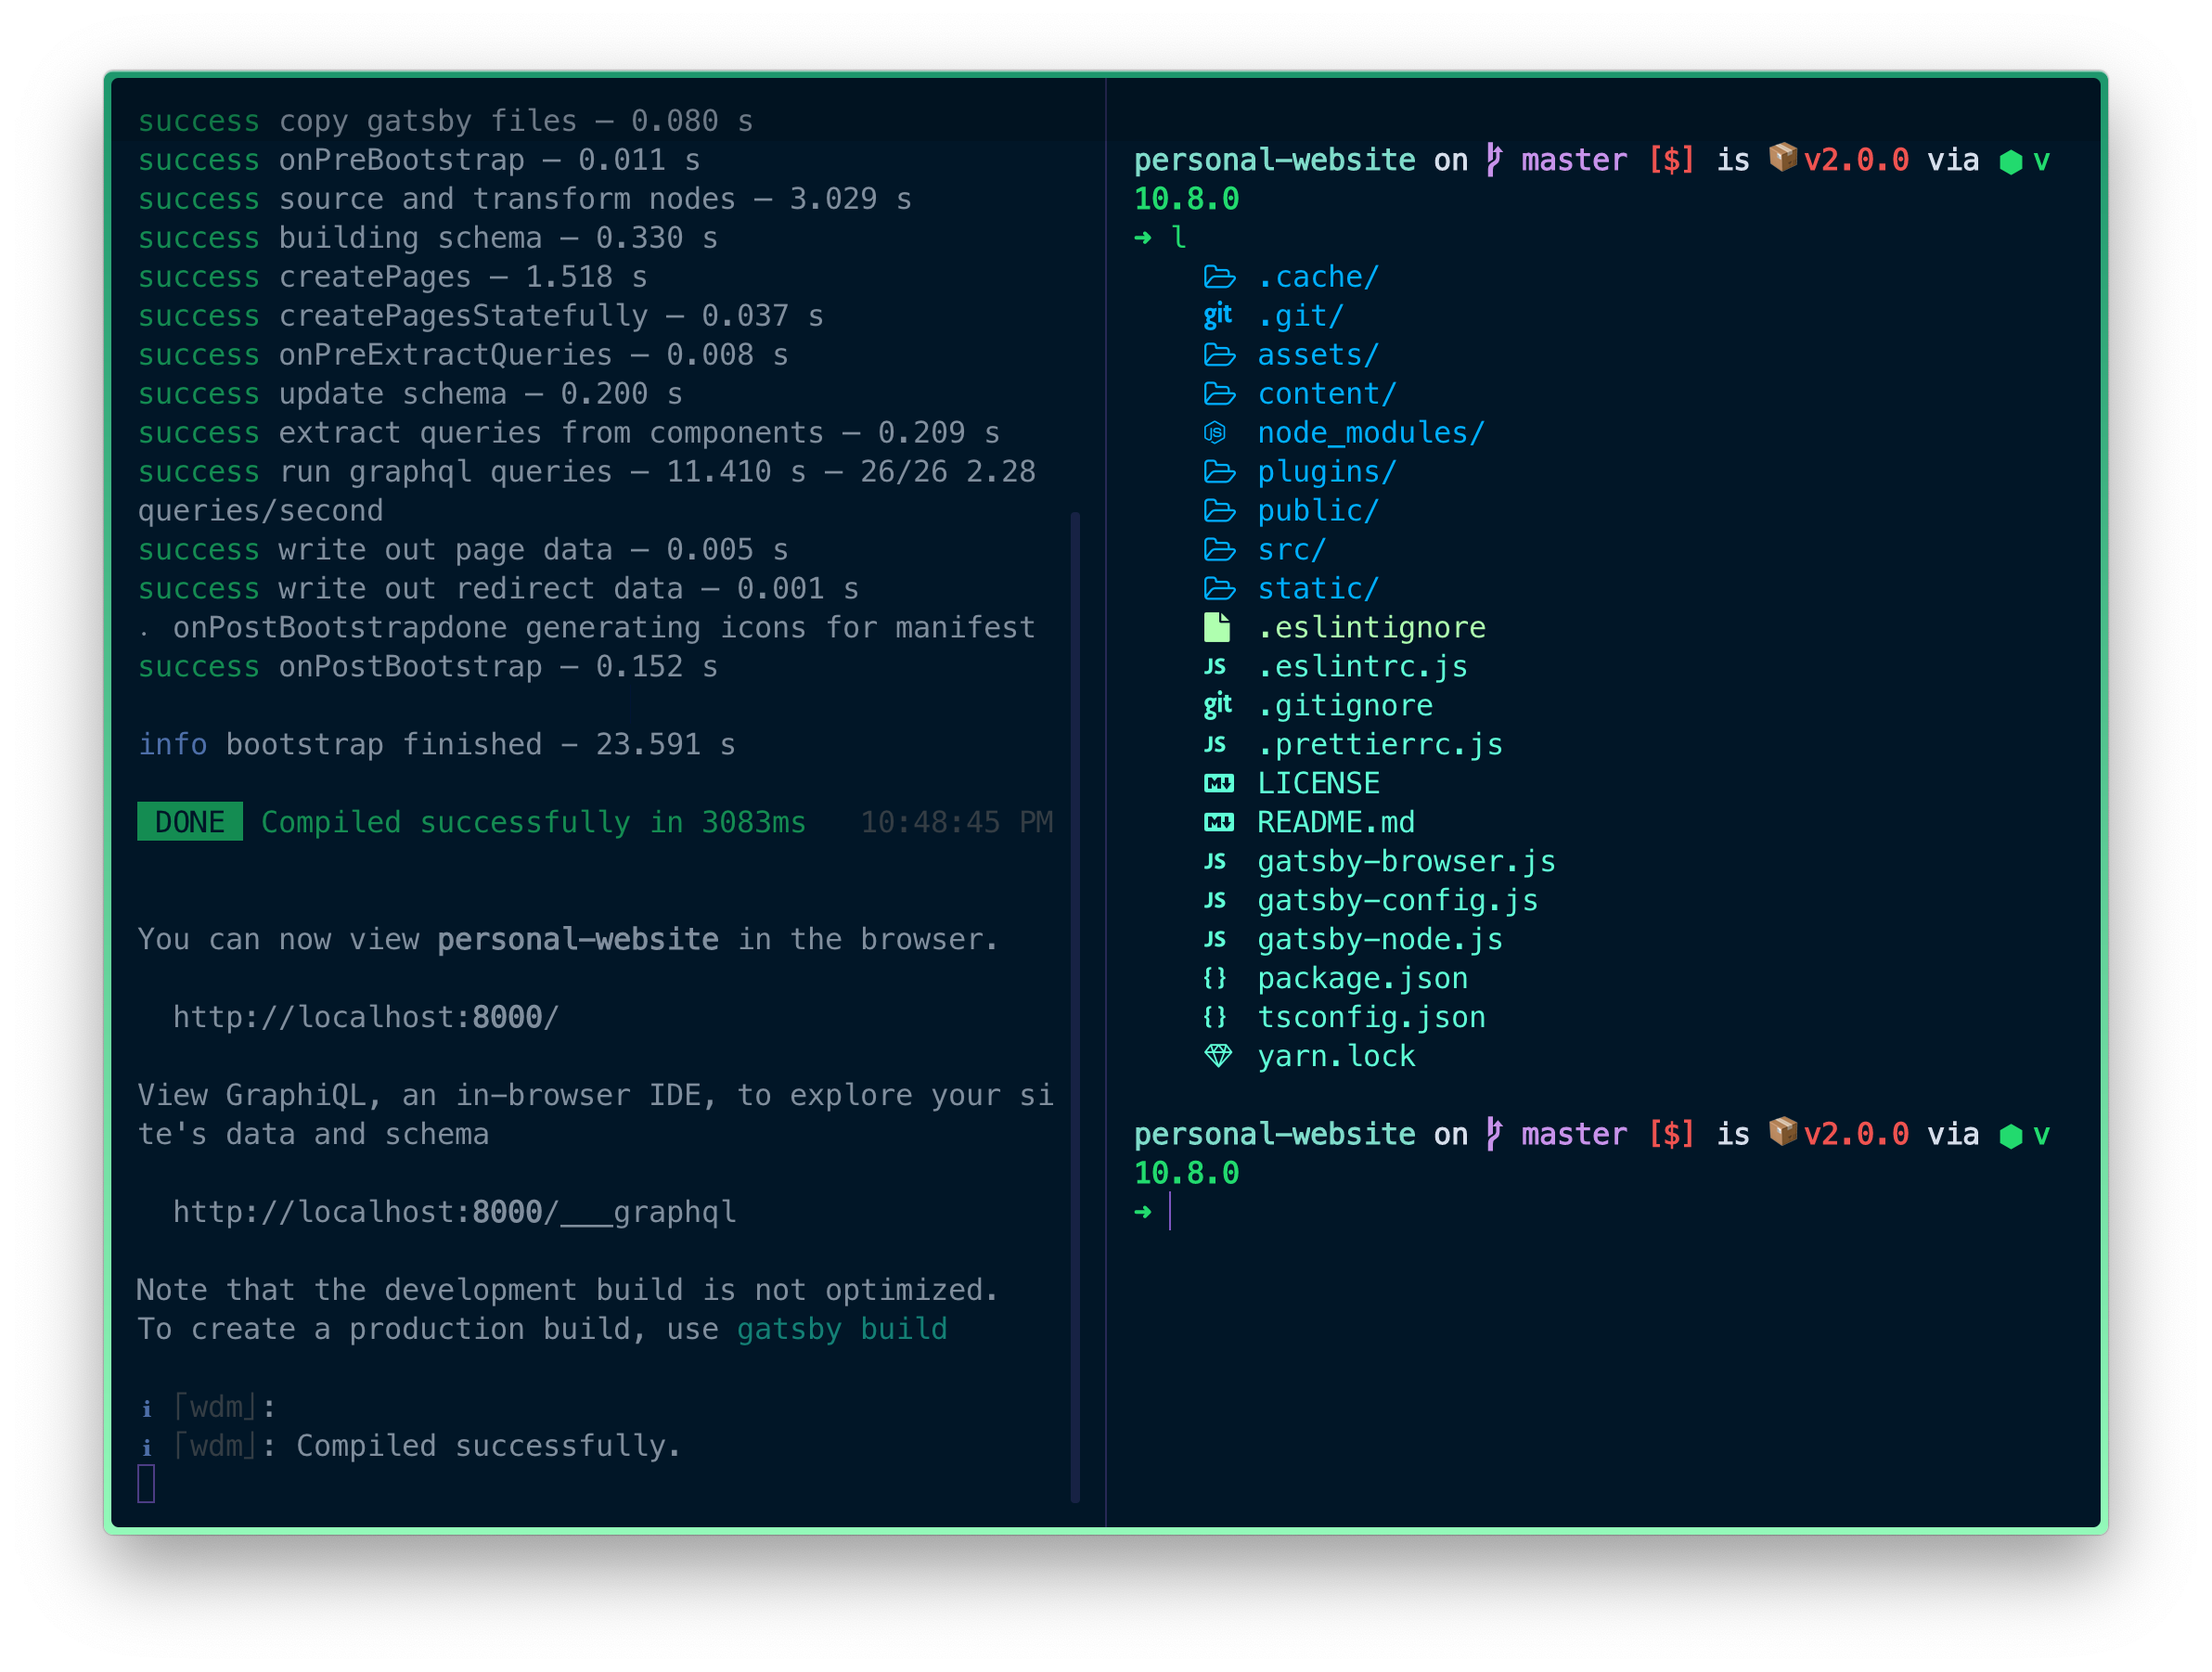
The prompt is the text that appears before writing out any command in the terminal. Using spaceship prompt with zsh shell, you are presented with a good set of information related to the directory your located in. Spaceship prompt can display the following information:- Directory name
- git repository information (e.g. branch name, files changed, local branch out of date with remote, etc)
- Current Node version
- Red prompt character when last command fails
- Package version (the one found in a
package.jsonfile) - and more
To install spaceship prompt run npm install -g spaceship-prompt. The command will automatically setup files on your file system as well as include some lines in the .zshrc file to load the spaceship prompt for every new terminal session.

Syntax Highlighting
zsh-syntax-highlighting allows for colors to be added to shell commands within zsh. Basically, this highlights actual commands in green while highlighting non-commands in red. This is useful to make sure what you are actually typing is a command.


To install zsh-syntax-highlighting, run the following commands:
1# Navigate the a folder where we can download the zsh-syntax-highlighting script2# Note: if the zsh folder does not exists in /usr/local/share, just create it3cd /usr/local/share/zsh4# Clone the zsh-syntax-highlighting repo5git clone https://github.com/zsh-users/zsh-syntax-highlighting.git6# Add a startup script to your .zshrc to enable syntax highlighting in new shell sessions7echo "source ${(q-)PWD}/zsh-syntax-highlighting/zsh-syntax-highlighting.zsh" >> ${ZDOTDIR:-$HOME}/.zshrc
Run the update command mentioned previously or open a new terminal session to see syntax highlighting enabled for shell commands.
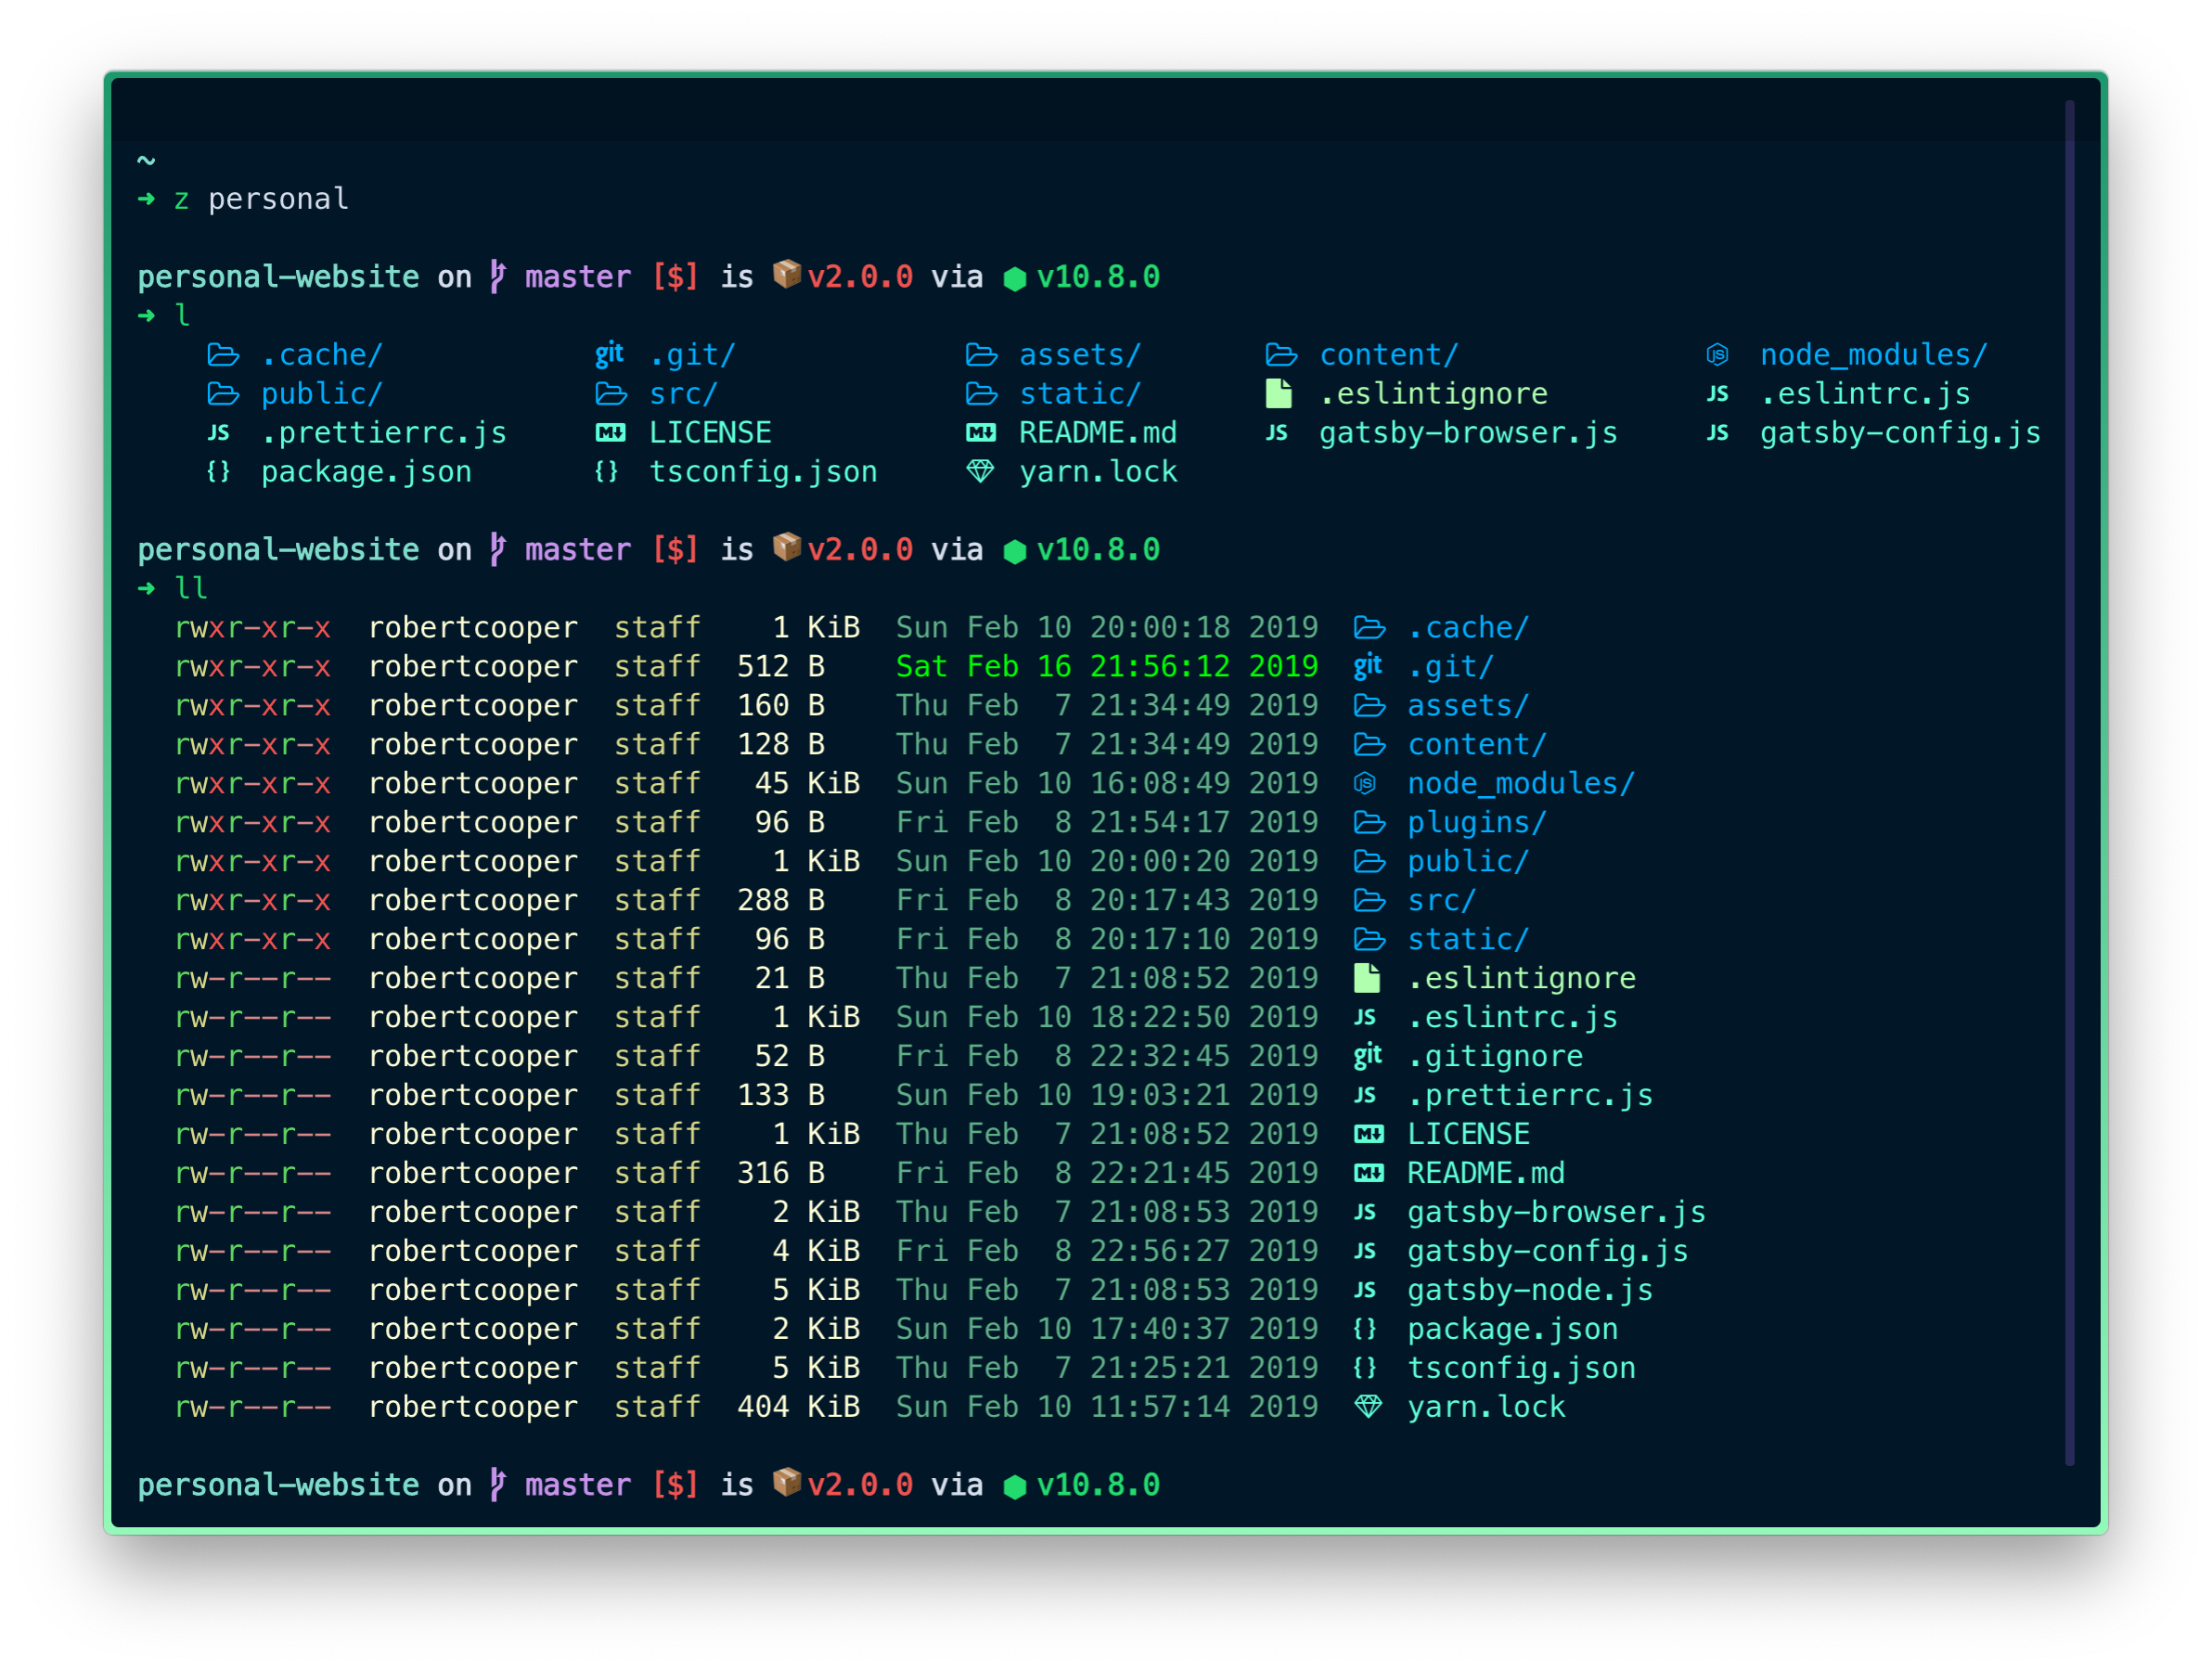
Directory Navigation
With zsh, you can install a z command which will allow you to quickly jump around commonly accessed directories. Using the z command followed by the name of a directory, you can navigate to a directory on your computer, no matter where the directory is nested in your file system (as long as you've previously accessed the file in the past). This saves you from navigating your computer's directory structure with the cd command.
The nice thing about the z command is that it does fuzzy matching, so you don't have to type the full name of a directory in order to be able to navigate to the directory.
z command, create a z.sh file in the /usr/local/etc/profile.d directory on you computer (doesn't have to be in that directory, but by convention that's where you should place application-specific startup files). The contents of the z.sh file should be taken from the Github repo for the z command.
Then, all you need to do is add the following line to your .zshrc file:
1# Allow the use of the z plugin to easily navigate directories2. /usr/local/etc/profile.d/z.sh
z command.
Folder and File Icons
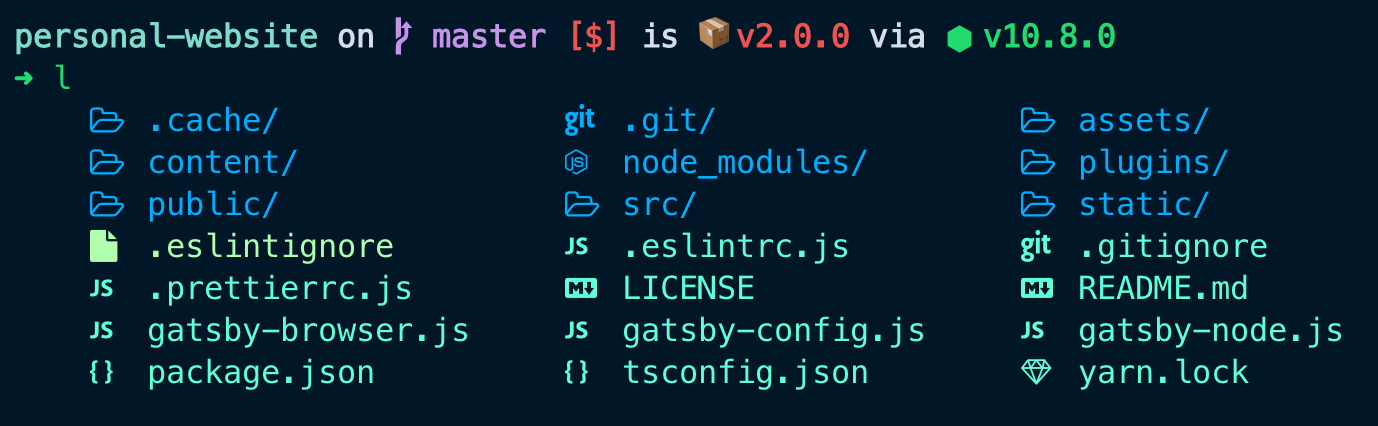
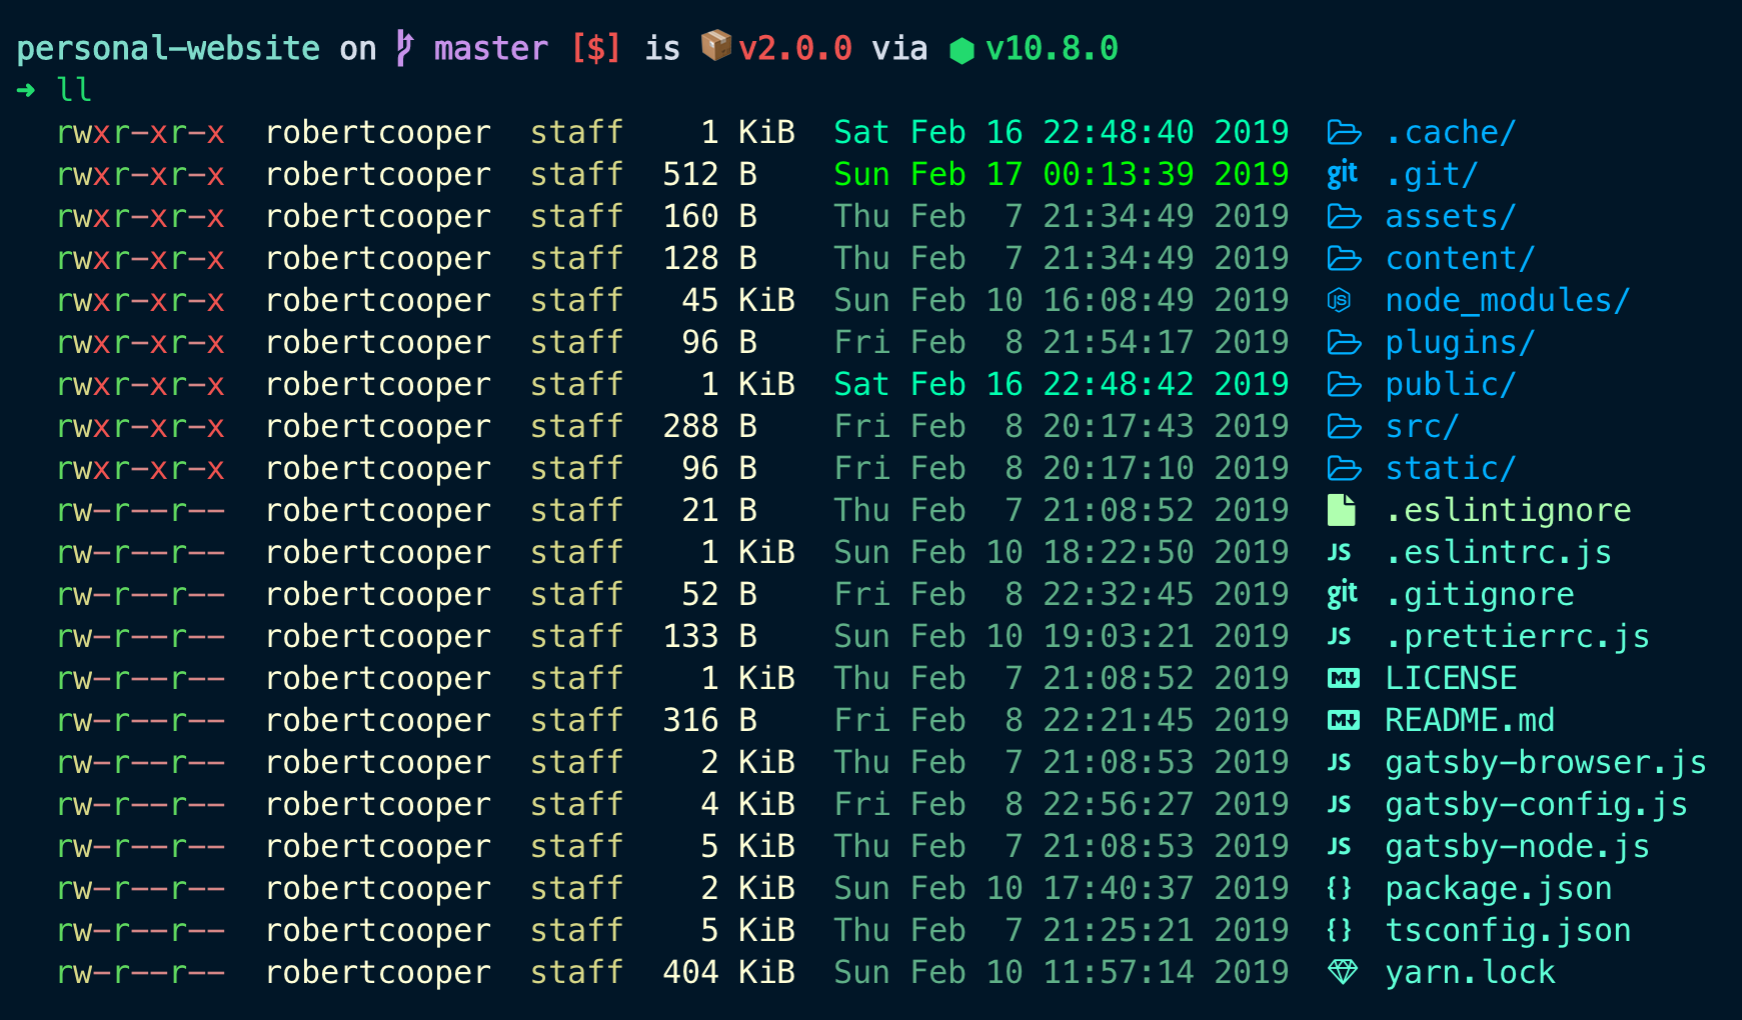
Using Color LS, you're able to list the contents of a directory and display icons beside folder and file names. Its like your normalls terminal command, except it includes icons. This helps to more quickly identify what content exists in a directory. Follow these instructions to install Color LS.
You're also able to customize the colors and icons used with Color LS. Personally, i've kept the default icons and have customized the colors using a dark_colors.yaml file. If you're interested in my custom set of colors, view this gist to see the contents of my dark_colors.yaml file.
The best way to work with Color LS is to set up an alias for l (list folder & file names only) and ll (list detailed information for folders & files) to display the contents of a directory. Here is my alias setup in my .zshrc configuration file.
1alias l='colorls --group-directories-first --almost-all'2alias ll='colorls --group-directories-first --almost-all --long' # detailed list view
Automatically Switch Node Versions
A lot of project directories contain a.nvmrc file which specifies which node version a project uses. The .nvmrc file works with nvm so a user can run the nvm use command to switch to the version of node specified in a .nvmrc file. However, an issue some developers run into is that they forget to manually run the nvm use command, which causes developers to be using a version of node that may not be compatible with the project they are working on.
Fortunately there is an easy way to automate this with zsh. Zsh gives users the ability to use hook functions to execute commands whenever certain shell actions occur. For example, we can run a script whenever the current working directory is changed in order to run the nvm use command if an .nvmrc file exists in the directory.
Here is the code to do just that (add this to your .zshrc file):
1# Automatically switch node versions when a directory has a `.nvmrc` file2autoload -U add-zsh-hook3# Zsh hook function4load-nvmrc() {5 local node_version="$(nvm version)" # Current node version6 local nvmrc_path="$(nvm_find_nvmrc)" # Path to the .nvmrc file78 # Check if there exists a .nvmrc file9 if [ -n "$nvmrc_path" ]; then10 local nvmrc_node_version=$(nvm version "$(cat "${nvmrc_path}")")1112 # Check if the node version in .nvmrc is installed on the computer13 if [ "$nvmrc_node_version" = "N/A" ]; then14 # Install the node version in .nvmrc on the computer and switch to that node version15 nvm install16 # Check if the current node version matches the version in .nvmrc17 elif [ "$nvmrc_node_version" != "$node_version" ]; then18 # Switch node versions19 nvm use20 fi21 # If there isn't an .nvmrc make sure to set the current node version to the default node version22 elif [ "$node_version" != "$(nvm version default)" ]; then23 echo "Reverting to nvm default version"24 nvm use default25 fi26}27# Add the above function when the present working directory (pwd) changes28add-zsh-hook chpwd load-nvmrc29load-nvmrc
Now any time you switch to a directory with a .nvmrc file, you will automatically switch to the node version specified in the .nvmcrc file.
Hyper Terminal
Hyper is a terminal app that's built with JavaScript using React for the UI and packaged with Electron to make it available as a desktop app across Mac, Windows, and Linux platforms. The best parts of Hyper are its UI, plugin system, and configurability. You can download Hyper from their website.
Configuration
The configuration of Hyper is done within a .hyper.js file found in your home directory. A quick way to edit this file is to open the Hyper app and then use the ⌘+, shortcut which will open .hyper.js in your default code editor.
The configuration file is where settings such as font size, colors, shells (e.g. bash, zsh, fish), and plugins can be configured. One important note is that plugins will overwrite your own config values specified in .hyper.js. For example, if you use a theme plugin which will set all the colors in your Hyper terminal, then all the colors you've specified in your .hyper.js will not take effect.
Border
One of the first things that might stand out from my terminal setup is the border surrounding the terminal. This can be added by using the hyperborder plugin and the colors are specified in ahyperBorder config object in .hyper.js:
1hyperBorder: {2 borderColors: ['#1D976C', '#93F9B9'],3 blurredColors: ['#177C59', '#84E0A6']4},
Theming
There are many Hyper theme plugins (with a lot of them listed in the awesome-hyper repository. Personally, I'm using the hyper-night-owl theme since it matches the Night Owl theme I use in VS Code.Tabs and Panes
Panes
You're able to split planes with ⌘+d (vertical panes) and ⌘+⇧+d (horizontal panes). I usually like to split panes when I want to do multiple things in the same project. For example, I might use one pane to compile assets and start a local web server, another pane to run tests, and then a third pane to run any other commands for the project.
Tabs
You're able to create new tabs using ⌘+t. I like to create new tabs to separate my terminal views between different projects.
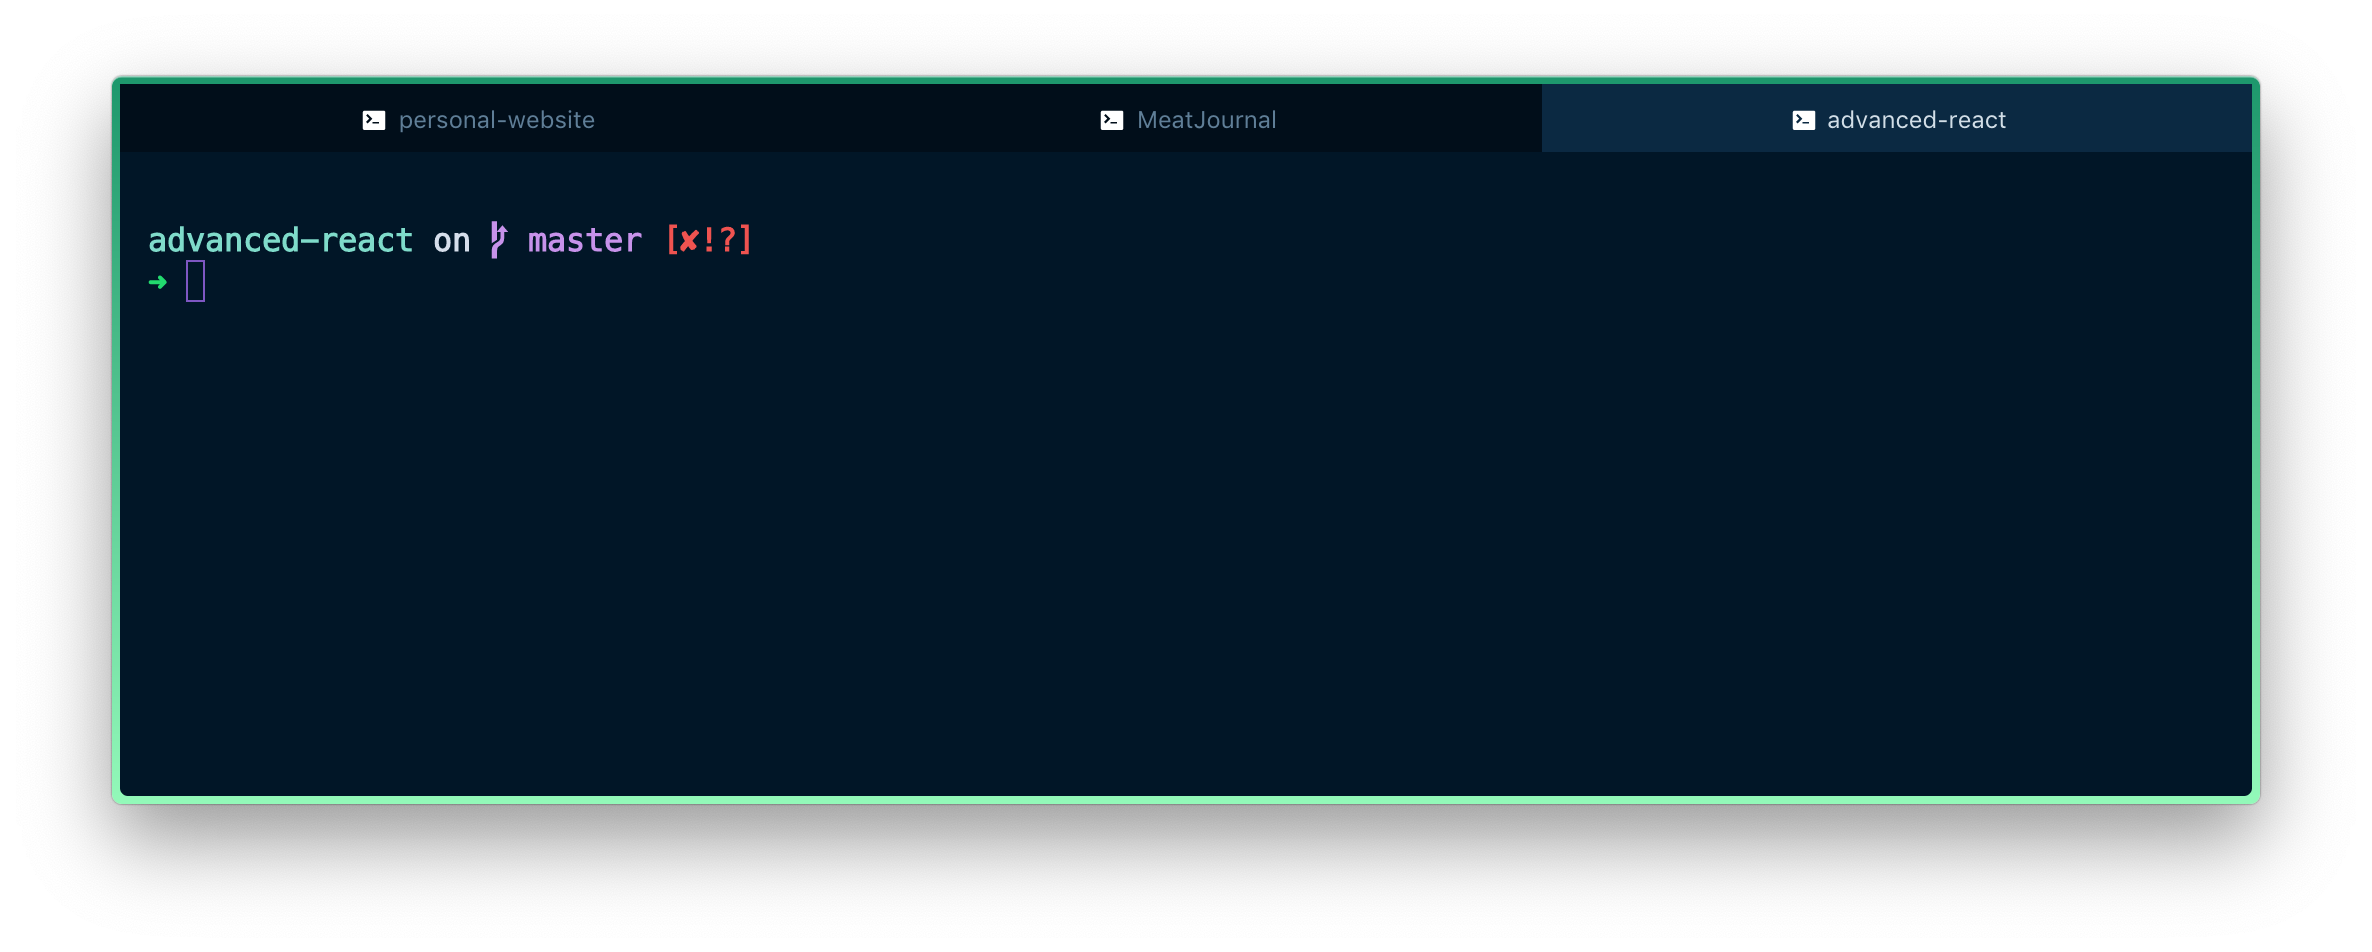
In order to keep the tab title minimal, I only include the name of the current directory. To do this with Zsh, we can create a precmd function hook in our .zshrc file which will be executed before each prompt:
1# Uses the zsh precmd function hook to set the tab title to the current working directory before each prompt2function precmd () {3 window_title="\\033]0;${PWD##*/}\\007"4 echo -ne "$window_title"5}
Terminal Performance
Hyper has recently updated their terminal to version 3 which comes with a major performance boost. This was for a long time one of the biggest problems with using Hyper since it relied on a DOM renderer which is inherently slow. This would cause the terminal to run slowly and crash when trying to run some CPU intensive commands. However, with the new renderer based on WebGL, the performance is greatly improved.Hopefully this article has given you ideas on how to improve your terminal setup. If you have your own unique terminal setups that help improve your development experience I'd love to hear about them.