This post is going to describe the following:
- How to create a Digital Ocean Droplet and install the latest version of Dokku on the Droplet
- How to deploy and run a dockerized application with Dokku and have it accessible through at a domain protected with SSL
- How to setup swap space to allow for rolling updates of a dockerized app on a server with insufficient memory
Background
I've recently been doing a lot of work with packaging web apps into docker containers and figuring out how to get everything deployed to servers. I started out deploying my dockerized apps to AWS EC2 servers (using ECS to allow for rolling updates), but it was too expensive to justify. Instead of AWS, I've migrated my web app to Digital Ocean Droplets which only cost $5/month. In order to manage the dockerized apps on the Droplets, i'm using Dokku.
Create a Digital Ocean Droplet
Create a Digital Ocean droplet with the following configuration:
- Ubuntu 18.04
- Standard plan - $5/month (1 GB Memory / 1 GB CPU / 25 GB SSD / 1000 GB transfer)
- Datacenter location closest to you
- SSH key authentication
- Hostname that is relevant to the app you want to deploy
Install Dokku
Digital Ocean allows you to create a droplet with Dokku pre-installed, but it won't be the latest version of Dokku. I prefer to use the latest version of Dokku in order to have all of its latest features.
At the time of writing, the latest version of Dokku is 0.19.13. The installation steps below may differ for newer versions. It might be worth double checking the below instructions with the Dokku install guide here.
SSH into your Digital Ocean server using the IP address of the droplet. In this example, the IP address is 159.89.230.158.
1ssh root@159.89.230.158
Once in the server, download and run the Dokku installation script.
1wget [https://raw.githubusercontent.com/dokku/dokku/v0.19.13/bootstrap.sh](https://raw.githubusercontent.com/dokku/dokku/v0.19.13/bootstrap.sh;)2sudo DOKKU_TAG=v0.19.13 bash bootstrap.sh
Notice that a variable named DOKKU_TAG is passed to the script. Make sure to set the value to the latest version of Dokku.
Once the script has completed, delete the script from the server.
1rm bootstrap.sh
In a browser, visit the droplet's IP address to finalize the setup of Dokku. Your public SSH key should be displayed in the textarea. For the hostname configuration, use the the droplet IP address and leave the "Use virtualhost naming for apps" checkbox unchecked.
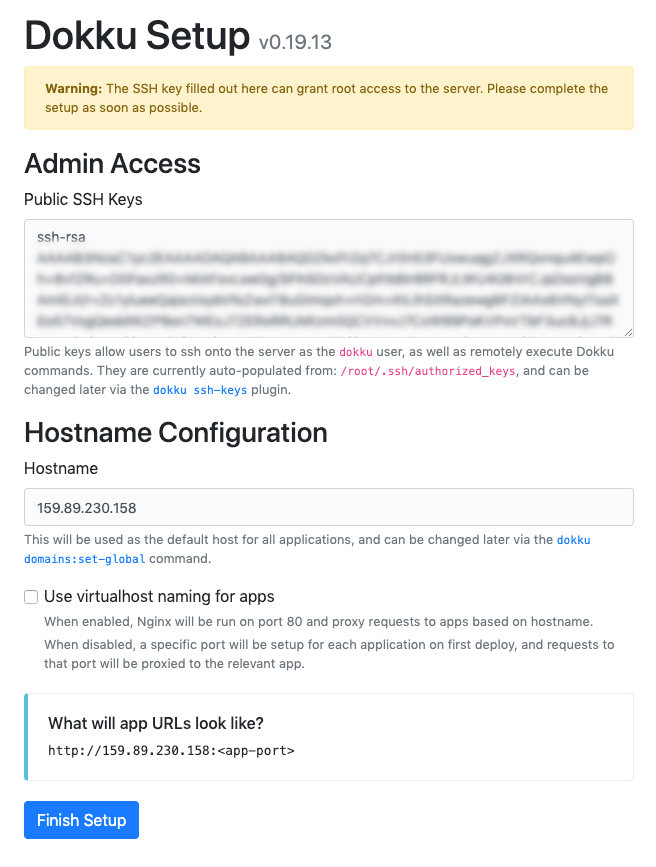
The configuration screen for Dokku found in a browser at the Droplet's IP address.
Deploy an application
On the server, create a Dokku app. In this case, the app is being named "frontend".
1dokku apps:create frontend
Outside of the Droplet and on your local machine, build the docker image of the app that should run on the droplet. In this case, Docker Compose is being used to build the docker image.
1docker-compose build frontend
Once the docker image is built, there are two approaches for getting the docker image onto the Droplet.
- Option 1: Upload the docker image directly onto your server
- Option 2: Upload the image to a container registry and then pull the image from the container registry to the Droplet.
I've had issues trying to upload large docker images directly to the server using option 1, so opt for option 2 if you find yourself in a similar situation.
Option 1: Upload image directly to server
First, make sure to tag the image you've just built to follow the naming convention required by Dokku. The naming convention takes the form of dokku/[dokku-app-name]:[version]. In this example, the locally built docker image is currently tagged as app/frontend.
1docker tag app/frontend:latest dokku/frontend:latest
Now, upload the image to the server. This can take a few minutes, depending on the size of your docker image.
1docker save dokku/frontend:latest | bzip2 | ssh root@159.89.230.158 "bunzip2 | docker load"
Option 2: Upload image to container registry and download image onto server
It's common to have docker images uploaded to a container registry during a CI/CD flows. The most popular container registry is probably Docker Hub. For this tutorial, AWS ECR is used as the container registry (they offer good pricing for private images). Therefore the following steps will outline how to upload images to ECR and pull those images to a Droplet.
Tag the local docker image to the name of the container repository on ECR. Replace the variables in square brackets with the appropriate values for the ECR repository of interest.
1docker tag app/frontend:latest [**aws_account_id**].dkr.ecr.[**region**].amazonaws.com/[**repository-name**]:latest
Push the tagged image to ECR.
1docker push [**aws_account_id**].dkr.ecr.[**region**].amazonaws.com/[**repository-name**]:latest
If the above two steps are unclear, read the AWS documentation on how to push an image to ECR.
SSH into the server and install the AWS CLI (official instructions found here). The AWS CLI is required in order to authenticate with AWS and pull images from ECR.
1curl "https://awscli.amazonaws.com/awscli-exe-linux-x86_64.zip" -o "awscliv2.zip" # Downloads the AWS CLI installation script2apt install unzip # Installs an unzip tool3unzip awscliv2.zip # Unzip the AWS CLI installation script4sudo ./aws/install # Runs the AWS CLI installation script5rm -r aws && rm awscliv2.zip # Remove the installation files
Configure the AWS CLI by running aws configure. Supply the command with AWS credentials and the region of the ECR repository. If the AWS CLI has previously been configured on a local machine, then the the AWS credentials can be found in the ~/.aws/credentials file.
Login to the ECR repository.
1aws ecr get-login-password | docker login --username AWS --password-stdin [**aws_account_id**].dkr.ecr.[**region**].amazonaws.com
Pull the latest image from the ECR repository.
1docker pull [**aws_account_id**].dkr.ecr.[**region**].amazonaws.com/[**repository-name**]:latest
Tag docker image as dokku/[dokku-app-name]:[version], which is the required naming convention for Dokku in order to be able to deploy the app.
1docker tag [**aws_account_id**].dkr.ecr.[**region**].amazonaws.com/[**repository-name**]:latest dokku/frontend:latest
Now that the docker image is on the the server and tagged in such a way to be recognized by Dokku, it is now possible to deploy the application. Verify that Dokku has the tagged image for your app.
1dokku tags frontend
The tagged image should be displayed in the output.
1REPOSITORY TAG IMAGE ID CREATED SIZE2dokku/frontend latest 97b6f8d77e2e 5 minutes ago 1.59GB
Deploy the image.
1dokku tags:deploy frontend latest
In order for the app to be accessible through the web, the server needs to map port 80 to the port of the deployed application container. For this example, the deployed app is running on port 3000, therefore the following command will map port 80 to 3000:
1dokku proxy:ports-set frontend http:80:3000
The port of the deployed app is determined by the port specified in the EXPOSE instruction in the app's Dockerfile. If a port is not specified through an EXPOSE instruction, Dokku will expose the app to port 5000 by default.
Verify the site is live by visiting the app in a browser at the server's IP address.
Setup application domain name
Next, configure a domain to point towards site. For this example, the domain of my-frontend-app.com will be used.
1dokku domains:set frontend my-frontend-app.com
Make sure to setup an A record on the domains DNS to point towards the server's IP address. Once the A record is successfully pointing to the server, the app should be accessible in a browser at that domain name.
Enable SSL on domain name
It is now possible to enable SSL on the domain using the Dokku Let's Encrypt plugin. Install the dokku plugin, configure the email to use for the Let's Encrypt certificate, and then attach an SSL certificate to the application.
1sudo dokku plugin:install https://github.com/dokku/dokku-letsencrypt.git2dokku config:set --no-restart frontend DOKKU_LETSENCRYPT_EMAIL=name@email.com3dokku letsencrypt frontend
Rolling updates
When it comes time to update the deployed application, a new image will need added to the server using option 1 or 2 outlined above. Once the images are on the server, the dokku tags:deploy command can be run, which will do what is called a "rolling update". This means a new docker container will be spun up to replace the existing docker container. In order to switch the docker containers without having any down time, the server must have enough resources (i.e. memory) to handle running 2 docker containers at once.
If there is insufficient memory on the server to allow for 2 docker containers to run at the same time, the deploy will fail and it could bring down your server. To get around this, the server should be upgraded with more memory (which means more $$) or the server can be configure with swap space. For more details on swap space and how to configure it on a digital ocean server, see this guide. The linked guide outlines the commands needed to setup swap space, and those are summarized below.
1sudo fallocate -l 1G /swapfile2sudo chmod 600 /swapfile3sudo mkswap /swapfile4sudo swapon /swapfile5sudo sysctl vm.swappiness=106sudo sysctl vm.vfs_cache_pressure=507sudo vi /etc/sysctl.conf8# Add the following to lines with vim to the bottom of the sysctl.conf file9# vm.swappiness=1010# vm.vfs_cache_pressure=5011sudo printf "vm.swappiness=10\nvm.vfs_cache_pressure=50" >> /etc/sysctl.conf
Miscellaneous
Dokku help
To see the set of available dokku commands, just use execute the dokku command and the available commands will be outputted to the console. Of course, there is always the official dokku documentation for more information.
Removing old docker images from server
Because the server has a limited amount of disk space, it's a good idea to clear out unused docker images that will accumulate on the server. For example, every time the latest version of a docker image is pulled on a server, the older version will be given a version of none. These docker images can safely be deleted using the following command.
1docker images | grep none | awk '{ print $3; }' | xargs docker rmi -f
Database setup on server using Dokku
Dokku has plugins that allow you to easily setup databases on your server and connecting them to your Dokku app. For example, I'm using the dokku mysql plugin on one of my Droplets.
Related Resources
Deploying a Typescript Server to Digital Ocean with Dokku - Ben Awad
Building a Continuous Integration & Deployment Pipeline Using Docker (CI/CD) - Tania Rascia